
Register Your Printer
Activate your warranty, software, and personalized support
FAQ
Registration is the single step that sets everything up at once: your Volty ID account, your 75-day software trial, your user seats (up to 10), and your activation key. It takes about 2 minutes and you only do it once.
The serial number is on a sticker on the bottom of the printer and on the side of the box your printer came in. It usually starts with VX followed by digits. If you can't find it, call (877) 600-1120 and we'll help locate it from your order.
Add the number of people who'll need to design or print badges. Every Volty ID subscription covers up to 10 users (one paid, nine free), so there's no cost benefit to adding fewer than you need. Common picks: small office uses 2–3, mid-size organization uses 5–7, larger team uses all 10.
Yes. To add users after registration, call (877) 600-1120 Option 2 or email cs@voltyid.com and we'll add the sub-licenses (up to 10 total).
The trial starts at registration — the moment you complete this step. You'll see your trial countdown in your voltyid.com account. Install the software whenever you're ready; the trial runs from the registration date.
Unbox Your Printer
Let's ensure you've got everything you need

Carefully unpack your printer and confirm all listed items are included
Carefully unpack your printer and confirm all listed items are included
Checklist modal items:
-

VX100 Single sided ID Card Printer + Integrated Software
-

Volti ID Card Software - Starter Edition
-

Volty ID Premium CR80 30 Mil Graphic Quality PVC Cards - 300 Pack
-

Volty Color Ribbon for Volty ID printers
-

Volti A11 Full HD 1080p Photo ID Camera
-

Power Cable & Adapter
-

USB Cable
-

Cleaning Kit (roller, stick,cards)
-

Warranty Card


FAQ
Registration is the single step that sets everything up at once: your Volty ID account, your 75-day software trial, your user seats (up to 10), and your activation key. It takes about 2 minutes and you only do it once.
The serial number is on a sticker on the bottom of the printer and on the side of the box your printer came in. It usually starts with VX followed by digits. If you can't find it, call (877) 600-1120 and we'll help locate it from your order.
Add the number of people who'll need to design or print badges. Every Volty ID subscription covers up to 10 users (one paid, nine free), so there's no cost benefit to adding fewer than you need. Common picks: small office uses 2–3, mid-size organization uses 5–7, larger team uses all 10.
Yes. To add users after registration, call (877) 600-1120 Option 2 or email cs@voltyid.com and we'll add the sub-licenses (up to 10 total).
The trial starts at registration — the moment you complete this step. You'll see your trial countdown in your voltyid.com account. Install the software whenever you're ready; the trial runs from the registration date.
Connect Your Printer
Plug your printer into power, then connect it to your computer with the provided USB cable. Place it securely on a flat surface.

Important:
Only use the original power cord, adapter, and USB cable. Third-party accessories may cause issues with power, connection, or print quality.


Step 1:
Take out the power cable and power adapter from the accessories box. Connected all cables as below picture.

Step 2:
The power adapter DC output connected to the card printer power interface, and the power line AC input connected to the mains socket.

Step 3:
USB communication interface installation: USB-A interface (square type) connect to PC end and USB-B interface (round type) connect to card printer’s USB port.
FAQ
Registration is the single step that sets everything up at once: your Volty ID account, your 75-day software trial, your user seats (up to 10), and your activation key. It takes about 2 minutes and you only do it once.
The serial number is on a sticker on the bottom of the printer and on the side of the box your printer came in. It usually starts with VX followed by digits. If you can't find it, call (877) 600-1120 and we'll help locate it from your order.
Add the number of people who'll need to design or print badges. Every Volty ID subscription covers up to 10 users (one paid, nine free), so there's no cost benefit to adding fewer than you need. Common picks: small office uses 2–3, mid-size organization uses 5–7, larger team uses all 10.
Yes. To add users after registration, call (877) 600-1120 Option 2 or email cs@voltyid.com and we'll add the sub-licenses (up to 10 total).
The trial starts at registration — the moment you complete this step. You'll see your trial countdown in your voltyid.com account. Install the software whenever you're ready; the trial runs from the registration date.
Install the Ribbon and Cards
Set up your ribbon and load cards properly. Follow the visual guide carefully to install your ribbon and cards, avoiding jams and errors.

Step 1:
Open the ribbon box, take out the ribbon.

Step 2:
Install the ribbon into the cartridge according to the color direction.

Step 3:
As shown in picture below, take ribbon cartridge’s side, install the ribbon cartridge and close the upper cover.
FAQ
Registration is the single step that sets everything up at once: your Volty ID account, your 75-day software trial, your user seats (up to 10), and your activation key. It takes about 2 minutes and you only do it once.
The serial number is on a sticker on the bottom of the printer and on the side of the box your printer came in. It usually starts with VX followed by digits. If you can't find it, call (877) 600-1120 and we'll help locate it from your order.
Add the number of people who'll need to design or print badges. Every Volty ID subscription covers up to 10 users (one paid, nine free), so there's no cost benefit to adding fewer than you need. Common picks: small office uses 2–3, mid-size organization uses 5–7, larger team uses all 10.
Yes. To add users after registration, call (877) 600-1120 Option 2 or email cs@voltyid.com and we'll add the sub-licenses (up to 10 total).
The trial starts at registration — the moment you complete this step. You'll see your trial countdown in your voltyid.com account. Install the software whenever you're ready; the trial runs from the registration date.
Install the Printer Driver
Get the latest driver for smooth printing

Download and install the driver for your printer
Windows DownloadFAQ
Registration is the single step that sets everything up at once: your Volty ID account, your 75-day software trial, your user seats (up to 10), and your activation key. It takes about 2 minutes and you only do it once.
The serial number is on a sticker on the bottom of the printer and on the side of the box your printer came in. It usually starts with VX followed by digits. If you can't find it, call (877) 600-1120 and we'll help locate it from your order.
Add the number of people who'll need to design or print badges. Every Volty ID subscription covers up to 10 users (one paid, nine free), so there's no cost benefit to adding fewer than you need. Common picks: small office uses 2–3, mid-size organization uses 5–7, larger team uses all 10.
Yes. To add users after registration, call (877) 600-1120 Option 2 or email cs@voltyid.com and we'll add the sub-licenses (up to 10 total).
The trial starts at registration — the moment you complete this step. You'll see your trial countdown in your voltyid.com account. Install the software whenever you're ready; the trial runs from the registration date.
Install and Activate Volty ID Software
Unlock your software with your activation code

Activation Code
Install Volty ID software, then enter the activation code below. We've also emailed it to you

Volty ID Starter Edition
Windows DownloadFAQ
Registration is the single step that sets everything up at once: your Volty ID account, your 75-day software trial, your user seats (up to 10), and your activation key. It takes about 2 minutes and you only do it once.
The serial number is on a sticker on the bottom of the printer and on the side of the box your printer came in. It usually starts with VX followed by digits. If you can't find it, call (877) 600-1120 and we'll help locate it from your order.
Add the number of people who'll need to design or print badges. Every Volty ID subscription covers up to 10 users (one paid, nine free), so there's no cost benefit to adding fewer than you need. Common picks: small office uses 2–3, mid-size organization uses 5–7, larger team uses all 10.
Yes. To add users after registration, call (877) 600-1120 Option 2 or email cs@voltyid.com and we'll add the sub-licenses (up to 10 total).
The trial starts at registration — the moment you complete this step. You'll see your trial countdown in your voltyid.com account. Install the software whenever you're ready; the trial runs from the registration date.
Test Your Printer
Print your first test card. Check alignment, clarity, and color quality

Step 1:
Turn on the printer.

Step 2:
Press and hold the printer's front-panel button until the test card prints.

Step 3:
Verify that card prints correctly (colors, text clearly visible, no faded areas).
FAQ
Registration is the single step that sets everything up at once: your Volty ID account, your 75-day software trial, your user seats (up to 10), and your activation key. It takes about 2 minutes and you only do it once.
The serial number is on a sticker on the bottom of the printer and on the side of the box your printer came in. It usually starts with VX followed by digits. If you can't find it, call (877) 600-1120 and we'll help locate it from your order.
Add the number of people who'll need to design or print badges. Every Volty ID subscription covers up to 10 users (one paid, nine free), so there's no cost benefit to adding fewer than you need. Common picks: small office uses 2–3, mid-size organization uses 5–7, larger team uses all 10.
Yes. To add users after registration, call (877) 600-1120 Option 2 or email cs@voltyid.com and we'll add the sub-licenses (up to 10 total).
The trial starts at registration — the moment you complete this step. You'll see your trial countdown in your voltyid.com account. Install the software whenever you're ready; the trial runs from the registration date.
Start Designing Cards
Design professional-quality ID cards easily

Step-by-Step Tutorials: Designing Your ID Card and Setting Up the Database

Clear, step-by-step instructions for designing a basic ID card

Instructions for setting up the internal database


Import Your Data from Excel or CSV
Easily import your names, photos, ID numbers, barcodes, or any other card data from Excel or CSV. This makes card printing fast and automated—no manual data entry required.
How to import dataFollow The Instructions Step-by-Step
1. Click “Connect to Database” inside the Volty ID software.
This button is usually found in the top toolbar under the Database tab.
2. Choose “Direct Excel File Driver”
This option lets you connect directly to your Excel spreadsheet without needing to convert or install anything else.
3. Browse and Select Your Excel File (.xlsx or .csv)
Once selected, click Next to continue.
4. Choose the Worksheet and Define the Header Row
Select the sheet you want to import.
- Check the box if your first row contains column names (headers).
- Set where your data starts (usually row 2).
5. Configure Column Data Types (if needed)
Most columns can be left as-is.
- If you’re importing dates or times, make sure to manually set the column type to avoid formatting issues.
6. Select the Columns to Use
Pick the data fields you want to connect to your card layout (e.g., First Name, Photo, Barcode, etc.).
7. Assign a “Guide Column”
Choose one column to act as the unique identifier for each record—this is usually an ID number or email.
8. Finalize and Click “Finish”
voltyid will now link the database to your card project. You’ll see your data loaded in the record list.
Important:
Your Excel or CSV file *must remain closed* while working in Volty ID, or the connection won't work
Using the Data on Your Card Design
Once connected, simply drag and drop any column field onto your card layout—names, photos, barcodes, etc.
Want to add a photo?
Just drag the “Photo” column onto your design and it will auto-fill per record.
Essential Maintenance Tips
Keep your printer running smoothly

Regular cleaning prevents errors and ensures optimal print quality
Get Printer GuideClean your printer every time you change the ribbon
This is critical to avoid faded cards and damage to the printhead. Use the official cleaning kit and cleaning cards provided with your printer for optimal results.

Cleaning card moving path
Deposition of dust or contaminants inside the card printer may cause damage to important parts and affect the printing effect. Therefore, it’s recommended to clean the printer when changing the ribbon or at least clean one time a month.

Step 1:
Take out the cleaning card from the accessory box and remove the 3M hyaline layer on cleaning card’s both sides and put it into input hopper.

Step 2:
When Card printer shows “Ready”, press “OK” one time, then press “>” two times.

Step 3:
LCM show “Clean function” press “OK” one time. Then LCM will show “Open the cover”.

Step 4:
Open the cover, take out ribbon cartridge, and then close the upper cover.

Step 5:
Press “OK” one time. The card printer will start to cleaning.

Step 6:
The cleaning card will be exit from card exit mouth after finished cleaning. After it, please install the ribbon cartridge and close the upper cover.
Cleaning print head steps:

Step 1:
Take out cleaning stick from accessories box.

Step 2:
Turn off the card printer, open the upper cover and find the print head show in below picture.

Step 3:
Wipe the print head in one direction, from left to right or right to left with cleaning stick. Do not wipe back and forth. Generally wipe 3-5 times will be ok.
Proper Ribbon Replacement
1. Power off your printer.
2. Open the ribbon cover.
3. Remove the used ribbon and insert the new one, ensuring correct alignment.
4. Close the cover and restart the printer.
Use original ribbons only to maintain quality and avoid malfunctions.

Faded Prints:
- Check if the ribbon is properly installed.
- Clean the printhead using a cleaning card.
Card Jams:
- Remove any stuck cards carefully.
- Ensure cards are properly loaded and are the correct type.

You're All Set!
Everything you need to get started and keep printing — drivers, guides, and compatible supplies.

Helpful Videos

Clear, step-by-step instructions for designing a basic ID card

Instructions for setting up the internal database
Step-by-Step Setup Guides
Not sure where to begin? These quick guides walk you through every step — from unboxing to printing perfect ID cards

Setting Up Your Printer
Learn how to unpack, connect, and run your first test print — in under 10 minutes

Getting Started with the Software
Step-by-step setup for your driver and software. Includes screenshots and common troubleshooting tips

Designing Eye-Catching ID Cards
Tips and templates for making cards look clean, readable, and professional — even with no design experience
Setting Up Your Printer
Learn how to unpack, connect, and run your first test print — in under 10 minutes
Getting Started with the Software
Step-by-step setup for your driver and software. Includes screenshots and common troubleshooting tips
Designing Eye-Catching ID Cards
Tips and templates for making cards look clean, readable, and professional — even with no design experience
Need Answers? We've Got You
Registration is the single step that sets everything up at once: your Volty ID account, your 75-day software trial, your user seats (up to 10), and your activation key. It takes about 2 minutes and you only do it once.
The serial number is on a sticker on the bottom of the printer and on the side of the box your printer came in. It usually starts with VX followed by digits. If you can't find it, call (877) 600-1120 and we'll help locate it from your order.
Add the number of people who'll need to design or print badges. Every Volty ID subscription covers up to 10 users (one paid, nine free), so there's no cost benefit to adding fewer than you need. Common picks: small office uses 2–3, mid-size organization uses 5–7, larger team uses all 10.
Yes. To add users after registration, call (877) 600-1120 Option 2 or email cs@voltyid.com and we'll add the sub-licenses (up to 10 total).
The trial starts at registration — the moment you complete this step. You'll see your trial countdown in your voltyid.com account. Install the software whenever you're ready; the trial runs from the registration date.
Keep Printing Without Pause — Grab Your Supplies
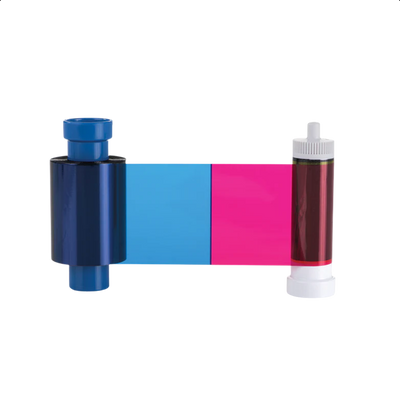
Genuine YMCKO Full-Color Ribbon, 100 Prints, for VX100 ID Card Printer
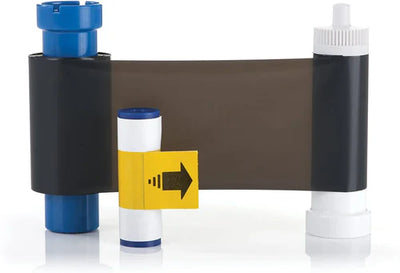
Volty ID VXrK2000 Genuine Monochrome Black Ribbon, 2,000 Prints, for VX100, VX200, and VX300 ID Card Printers

Volty ID 500-Pack Bulk Blank White PVC ID Cards, 30 Mil CR-80 Credit Card Size, Print-Ready for VX100/VX200/VX300 Printers
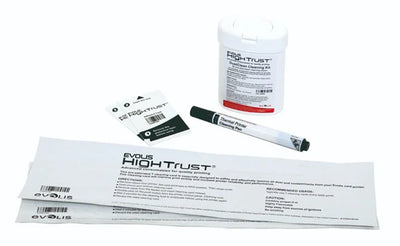
Volty ID VXCKIT Genuine Cleaning Kit for VX100, VX200, VX300 ID Card Printers — 5 Swabs, 3 Cloths, 10 Cleaning Cards
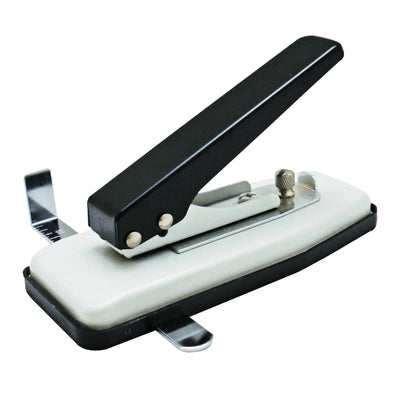
Volty ID Heavy-Duty Handheld ID Card Slot Punch, Reinforced Steel, Cuts Clean Lanyard Slots in CR-80 PVC Cards

Volty ID VXP610 Genuine OEM Ribbon Cartridge Replacement for VX100, VX200, VX300 ID Card Printers

Volty ID VXP660 Genuine Hopper Counterweight Card for VX200 and VX300 Auto-Feed ID Card Printers (Keep a Spare)
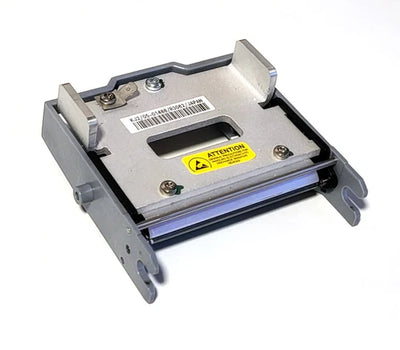
Volty ID VXP670 Genuine 300 DPI Replacement Printhead for VX100, VX200, VX300 ID Card Printers — OEM Part

Volty ID VXP700 Protective Storage Box with Custom Foam Insert for VX100, VX200, VX300 ID Card Printers
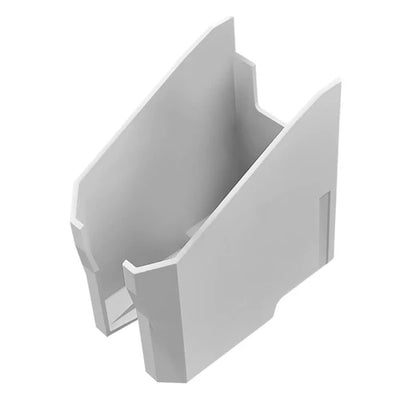
Volty ID VXP620 Genuine 100-Card Output Hopper Replacement for VX200 and VX300 Auto-Feed ID Card Printers

Volty ID VXP630 Genuine OEM Card Moving Roller Replacement for VX100, VX200, VX300 ID Card Printers

Volty ID VXP640 Genuine Adhesive Cleaning Roller Replacement, Protects Printhead, for VX100, VX200, VX300 Printers

Volty ID VXP650 Genuine OEM Ribbon Drive Gear Replacement for VX100, VX200, VX300 ID Card Printers
Reach The Right Team Fast
Our support team is ready to assist you.
Responses within one business day

Contact us
Need help right now? Contact us at
support@voltyid.com
for a quick response from our experts.
First-time setup or reinstalling?
Use the Setup WizardRegister your printer here
Go to Printer RegistrationRegistration successful
Your activation code will appear when installing your software.